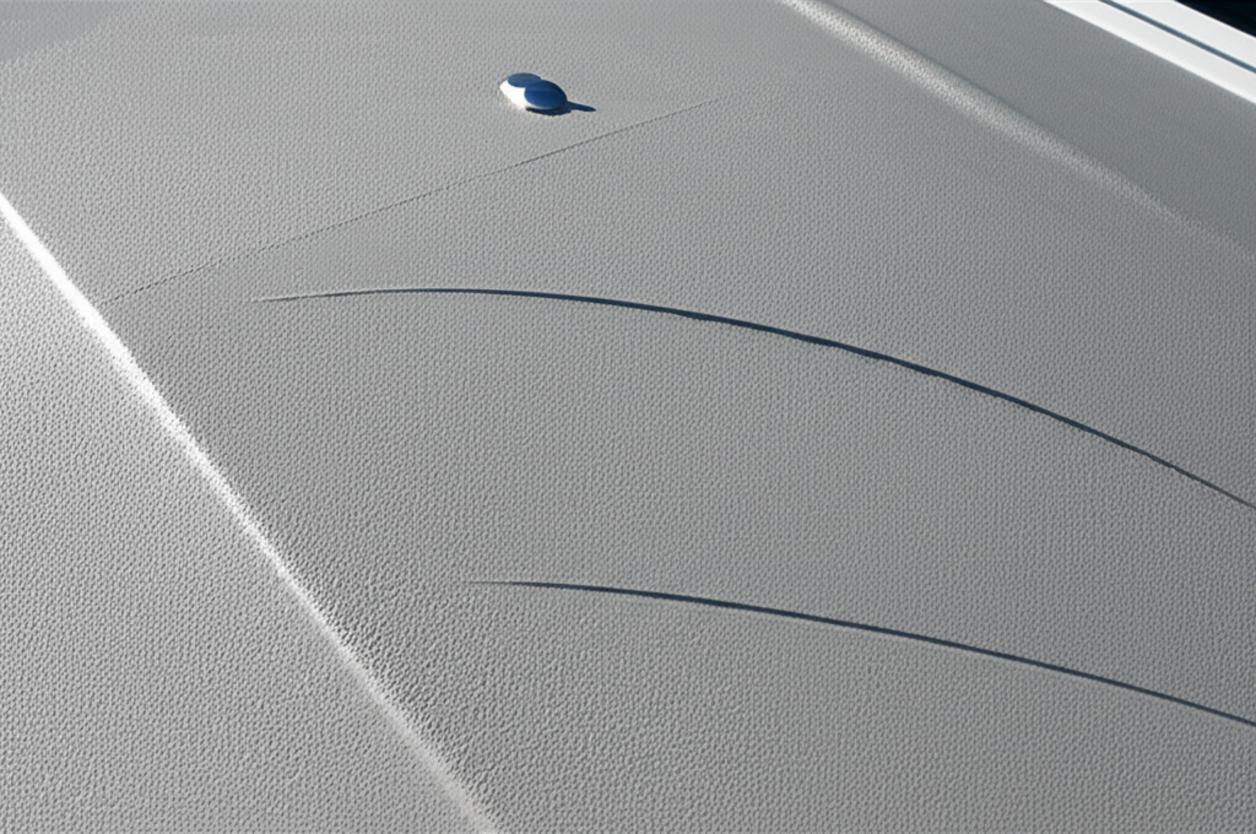
We’ve all seen them. Those fine, web-like lines spreading from a stanchion base or a tiny, singular crack appearing near a cleat. For a boat owner, discovering a new crack in the deck’s gelcoat can bring a familiar, sinking feeling. While it’s easy to dismiss them as simple cosmetic blemishes, these small fissures can be the proverbial chink in your vessel’s armor. They are not just unsightly; they are potential gateways for water intrusion, which can lead to much bigger, more expensive problems down the line, such as core delamination. The good news is that repairing minor gelcoat cracks is a highly achievable DIY project. With a little patience, the right materials, and a methodical approach, you can restore your deck’s integrity and appearance, keeping your boat in ‘Bristol fashion’.
Understanding the Enemy: What Causes Deck Cracks?
Before we dive into the repair, it’s helpful to understand what you’re dealing with. Gelcoat is the smooth, glossy outer layer of your fiberglass deck. Think of it as a very thick, durable, and somewhat brittle paint. Cracks typically fall into two categories:
* Crazing (or Spider Cracks): These are very fine, shallow cracks that often spread out in a web-like pattern. They are usually caused by the gelcoat becoming brittle from age and UV exposure, or from minor flexing of the deck beneath it. While alarming in appearance, they are typically cosmetic. * Stress Cracks: These are often single, deeper cracks that radiate from a point of high stress. Common culprits include overtightened hardware (like cleats, winches, or stanchions), a minor impact, or significant flexing in a specific area of the deck. These warrant more immediate attention as they are more likely to let water in.
It’s crucial to distinguish these from major structural cracks, which are often deep, wide, and may show signs of movement. If you suspect a crack is structural, or if the area around it sounds hollow when you tap it (a sign of delamination), it’s time to put down the tools and consult a professional marine surveyor or fiberglass expert.
The Essential Toolkit: Gathering Your Supplies
A professional-looking repair is all about preparation, and that includes having the right tools and materials on hand before you start. You don’t want to be scrambling for supplies once you’ve mixed your epoxy.
For Preparation: * Degreaser/Solvent: Acetone is the go-to for cleaning and de-waxing the area. * Rotary Tool (like a Dremel): With a small V-shaped or ball-shaped grinding bit. This is the best way to open up the crack. * Alternative to Rotary Tool: A ‘church key’ can opener or a dedicated crack-opening tool works well for manually scraping open the crack. * Masking Tape: High-quality painter’s tape to isolate your work area. * Safety Gear: Nitrile gloves, safety glasses, and a dust mask or respirator are non-negotiable.
For the Repair: * Gelcoat Paste: This is thicker than regular gelcoat and is designed to fill cracks and gouges without running. It’s essential to get a close color match. Many suppliers offer color-matching kits, or you can buy a neutral base and add tinting pigments. * Catalyst (MEKP): Methyl Ethyl Ketone Peroxide is what makes the gelcoat harden. Handle with extreme care. * Mixing Sticks and Cups: For blending the paste and catalyst. * Plastic Spreader or Putty Knife: For applying the paste.
For Finishing: * Release Agent: Either a clear PVA mold release film, or simply a piece of wax paper or heavy-duty plastic taped tightly over the repair. * Sanding Block: Crucial for achieving a flat, even surface. * Wet/Dry Sandpaper: A range of grits is essential. Start with around 220 or 320, and progress through 400, 600, 800, and up to 1200 or 1500 for a perfect finish. * Polishing Compound: A marine-grade rubbing compound followed by a finer finishing polish. * Buffer/Polisher (Optional): Can be done by hand, but a machine saves time and effort. * High-Quality Marine Wax: To protect your finished repair.
[Image: A well-organized toolkit for gelcoat repair laid out on a clean non-slip boat deck, showing a Dremel, gelcoat paste, sandpaper, and safety glasses.]
The Step-by-Step Repair Process
With your toolkit ready, it’s time to get to work. Choose a calm, dry day with moderate temperatures—ideally out of direct, hot sunlight.
Step 1: Clean and Prepare the Area Thoroughly clean the crack and the surrounding area with acetone on a clean rag. This removes wax, dirt, and oils that could prevent the new gelcoat from bonding properly.
Step 2: Open the Crack (The ‘V-Groove’) This is the most crucial and often most intimidating step. You must widen the crack to give the new gelcoat paste enough surface area to grab onto. Using your Dremel on a low speed or your manual tool, carefully grind or scrape along the crack, creating a V-shaped groove. The bottom of the ‘V’ should be at the bottom of the crack. This ensures you’ve removed all the fractured, weak gelcoat and have a solid base for your repair.
Step 3: Mask Off the Area Use masking tape to create a clean border around the V-groove you just made. This will protect the surrounding undamaged gelcoat from paste and sanding scratches.
Step 4: Mix and Tint the Gelcoat Paste Follow the manufacturer’s instructions precisely. Scoop a small amount of gelcoat paste into a mixing cup. If you need to tint it, add the pigment drop by drop and mix thoroughly until you have a perfect match. Once you’re happy with the color, add the correct amount of MEKP catalyst and mix again. Work quickly and in small batches; once the catalyst is added, you have a limited working time before it starts to harden.
Step 5: Apply the Paste Using a plastic spreader, force the paste firmly into the V-groove. The goal is to eliminate any air bubbles. Overfill the groove slightly, leaving the paste proud of the surrounding deck. This is important because the material will shrink a tiny bit as it cures, and you’ll need the excess material to sand down to a flush surface.
Step 6: Seal the Repair to Cure Standard gelcoat will not fully harden if exposed to air. You must seal it. The easiest method is to lay a piece of wax paper or clear plastic over the wet paste and smooth it out. Alternatively, you can spray it with a PVA mold release agent. This creates an air barrier, allowing a full, hard cure.
Step 7: The Art of Sanding Once the gelcoat is rock-hard (allow at least 24 hours), it’s time for the finishing work. Remove your air barrier and tape. Begin wet sanding with your coarsest grit (e.g., 320) wrapped around a sanding block. Use plenty of water and light, even pressure. Your goal is to sand the excess filler down until it is perfectly flush with the surrounding deck. You’ll know it’s flush when the sanding pattern is uniform across the repair and the adjacent original gelcoat. Progressively work your way up through the finer grits (400, 600, 800, 1200), with each new grit removing the scratches from the previous one. The surface should feel silky smooth by the end.
Step 8: Compound and Polish With the sanding complete, the repair area will look dull. This is where the magic happens. Apply a small amount of rubbing compound and, using a clean cloth or a buffer, work the area until the shine starts to return. Wipe it clean and follow up with a finer finishing polish to bring back that deep, glossy finish that matches the rest of your deck.
Step 9: Wax and Protect Finally, apply a coat of high-quality marine wax over the repaired area to protect it from UV rays and the elements. Step back and admire your work—a virtually invisible repair that has restored both the look and the integrity of your deck.
Conclusion
Repairing minor deck cracks is more than just a maintenance chore; it’s an investment in your boat’s longevity and value. It’s a skill that builds confidence and deepens the connection between a sailor and their vessel. By taking a careful, step-by-step approach, you can eliminate those unsightly blemishes and ensure your deck remains strong, watertight, and ready for whatever the sea throws its way. Fair winds and flawless decks!